¶ Clog
The clog is a common problem in 3D printing, which can be divided into two types: extruder clog and nozzle clog.
¶ Extruder clog
Extruder clog is usually due to filament deformation stuck inside, causing it to fail to extrude and unload smoothly. Common causes and corresponding solutions are as follows:
1. The chamber temperature of the printer is too high, and the filament such as PLA and PETG is squished by the gear after becoming soft and stuck in the gear of the extruder.
- Reduce the heat bed temperature appropriately.
- Open the front door or top cover of the printer for heat dissipation during printing.
- It is best to use a filament with a high thermal deformation temperature
2. The gear of the extruder is abnormal, resulting in the extrusion is not smooth
- Set the nozzle temperature to 220 ℃, insert PLA filament and extrude it, and observe whether the nozzle extrudes the filament smoothly. If the extruded filament can fall vertically, the length is large and the appearance is smooth, it means that the internal channel of the nozzle is smooth and the extrusion gears are normal. If the extruded filament length is small and the appearance is rough, it means that the inner channel of the nozzle has been narrowed or there is an anomaly in the extrusion gears. Then it is necessary to remove the nozzle screws first, set the nozzle temperature to 220 ℃, and then manually push a section of PLA filament into the nozzle. If the extrusion is smooth, it indicates that the nozzle is good. Please disassemble the extruder to check whether the gear is worn or blocked by foreign matter, and replace or clean it.
3. The filament is too soft
- Some too-soft filaments, such as TPU 95A, may be flattened by the extruder gears and lead to clogging. Please avoid using such filament for printing
4. The diameter of the filament is too large or too small
- Sometimes the filament may become thicker due to bending or compression, or become thinner due to wear on the extruded gear, resulting in the inability to extrude normally. It is necessary to remove the filament and remove any abnormal parts before printing.
¶ Nozzle clog
1. Nozzle melting speed is too slow leading to clogging:
- The temperature of the nozzle is too low, which will cause it unable to extrude the filament smoothly. It is necessary to check whether the correct printing temperature is set. If the nozzle still cannot extrude the filament smoothly, it is possible that the heater of the nozzle has been damaged, and needs to be replaced.
- When the printing speed is too high, it will cause the filament to stay in the nozzle for too short a time and not fully melt, resulting in nozzle clogging. Please clear the nozzle and reduce the printing speed (or increase the printing temperature appropriately), and then print again.
2. The channel inside the nozzle is narrowed, which prevents the molten filament from being extruded smoothly
- After printing filament containing fiber and other particles such as PAHT-CF, the inside of the nozzle may be partially clogged due to particle residue and accumulation, so the nozzle needs to be unclogged and cleaned frequently. The method of unclogging and cleaning is as follows: remove the hot end screws, raise the temperature to between 250 - 280 ℃ and then scrape the inside of the nozzle with metal parts such as an Allen wrench, flush it with new filament, and unclog it with a needle until it can extrude smoothly (judged by extruding PLA filament at 220 ℃).Nozzle clogs If the nozzle can no longer be unclogged, you need to replace it with a new one. Also, when printing these filaments, it is recommended to use 0.6 mm or 0.8 mm nozzles to reduce the risk of nozzle clogging; do not use 0.2 mm nozzles as the risk of nozzle clogging is extremely high.
- After the nozzle is used for a long time, there will be more residue inside, which may also lead to poor extrusion. It is necessary to clean the inside of the nozzle until the extrusion is smooth. If it cannot be cleaned, it is recommended to replace a new nozzle.
- After printing PAHT-CF, PET-CF, PPS-CF and other high-temperature materials with high melting temperature, when you want to print PLA, TPU, PETG and other low-temperature materials with lower printing temperature and lower hardness, it is recommended to set the nozzle temperature to 250 - 300 °C first. Then, manually withdraw the high-temperature material, put in the low-temperature material to be printed, and then manually insert it to ensure that the residue of the high-temperature material and the new low-temperature material have been extruded. Next, set the nozzle temperature to 220 - 240 °C, and continue to extrude when the temperature is dropping. When it is stable, continue to extrude and make sure that the new material can successfully be extruded out of the nozzle. Finally, prepare for the next printing. If it is found that it fails to extrude when flushing the last material with new material, it is necessary to increase the temperature of the nozzle and use a needle to clear the nozzle.
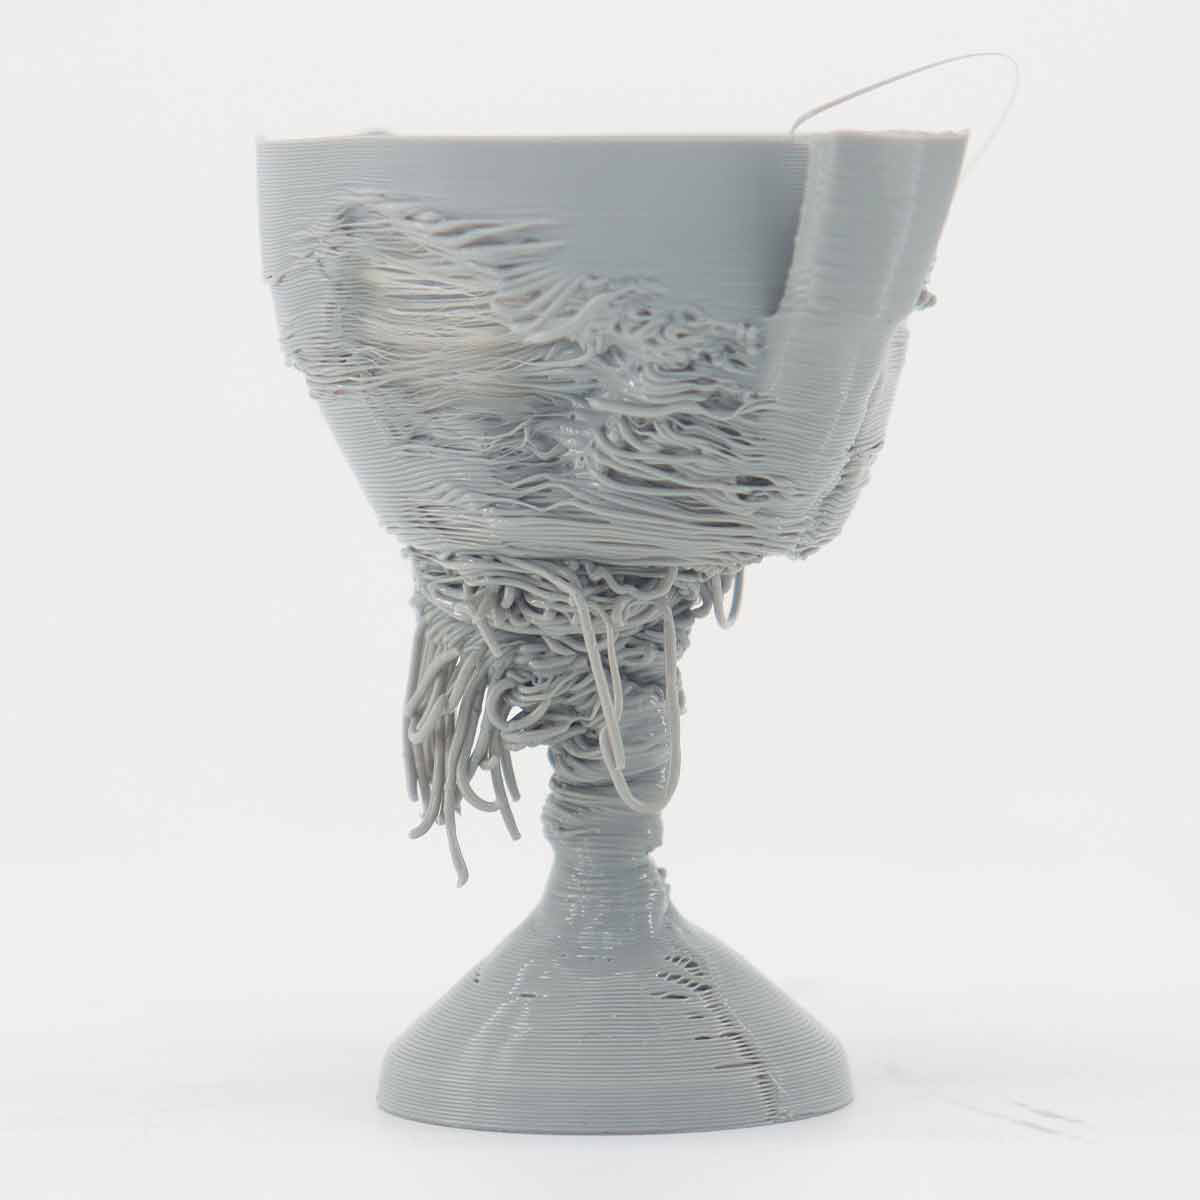
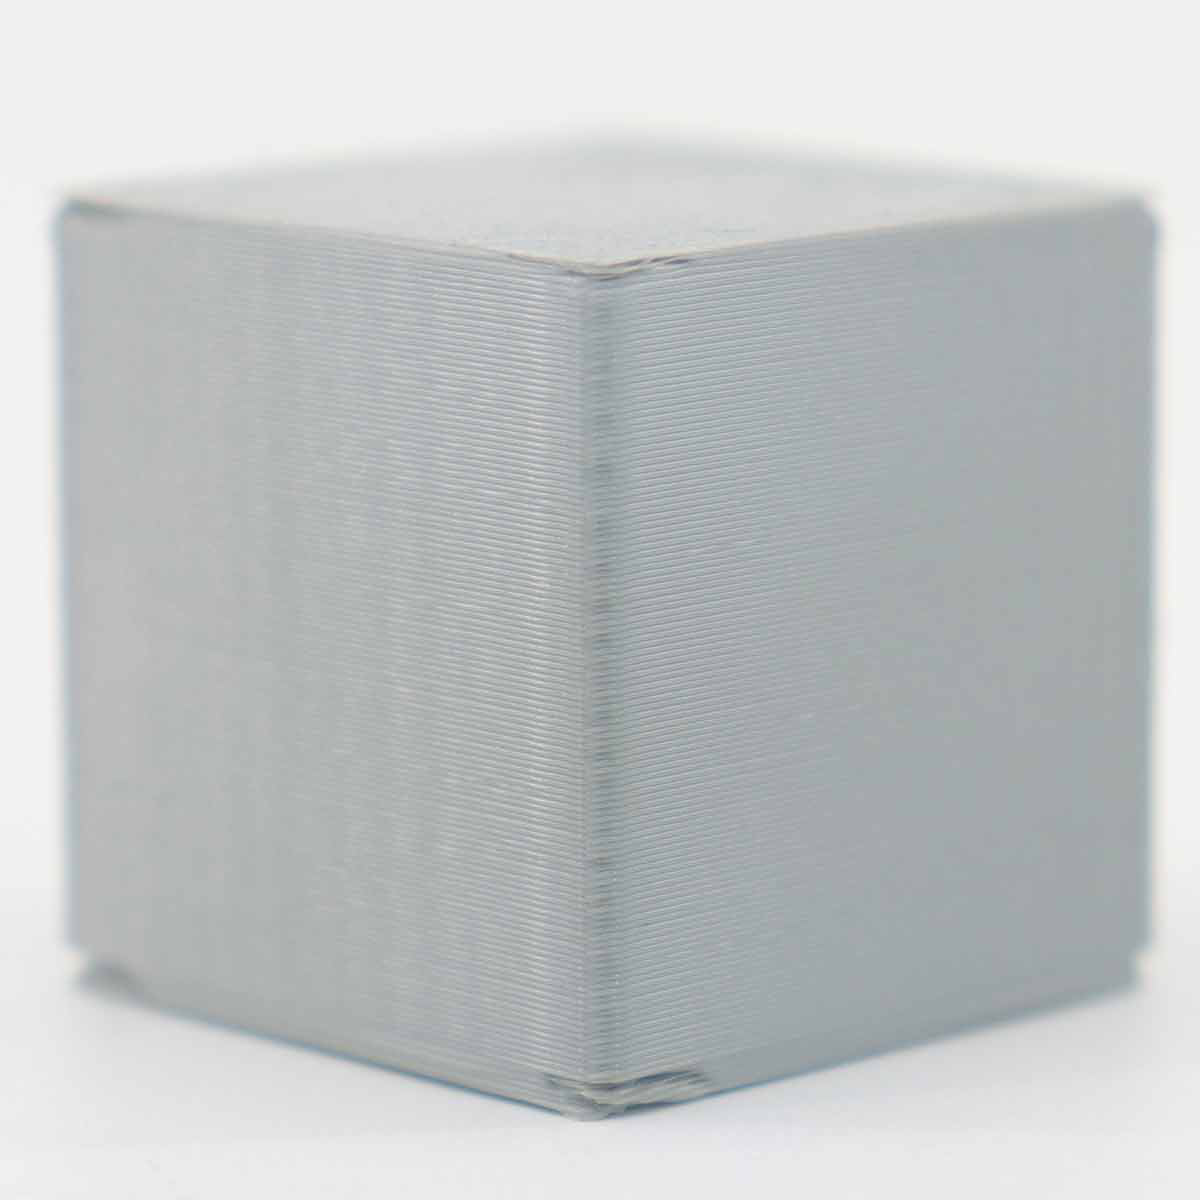
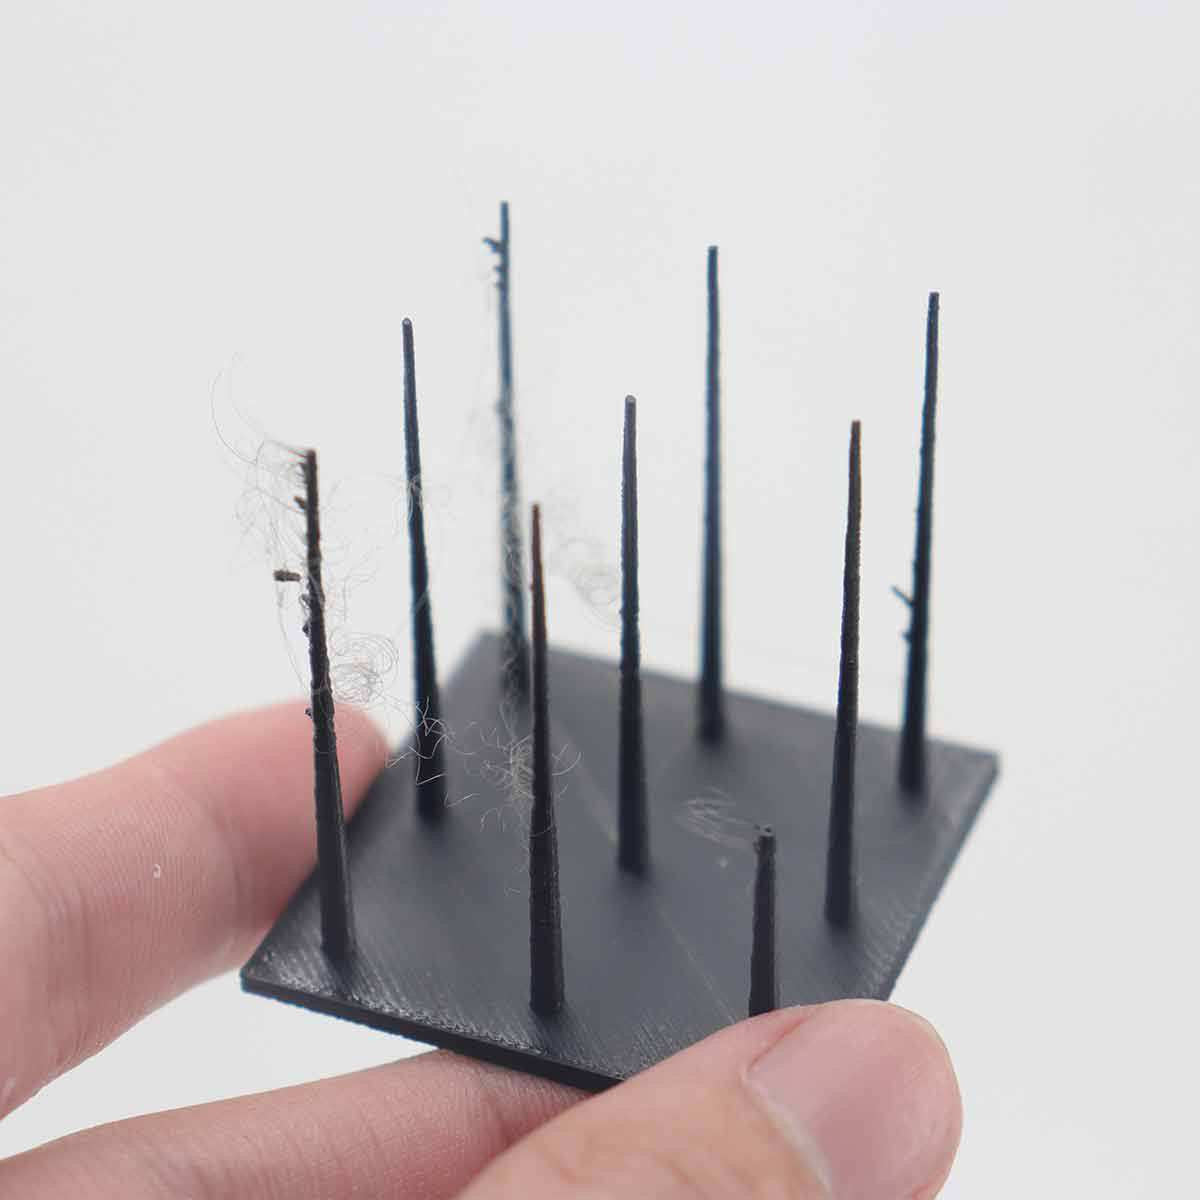
¶ Bad overhang quality
Cause: When printing the overhanging surface, the extruded filament is not cooled in time and bonds to the specified position, resulting in dropping, which is usually shown as follows:
It is recommended to try the following methods:
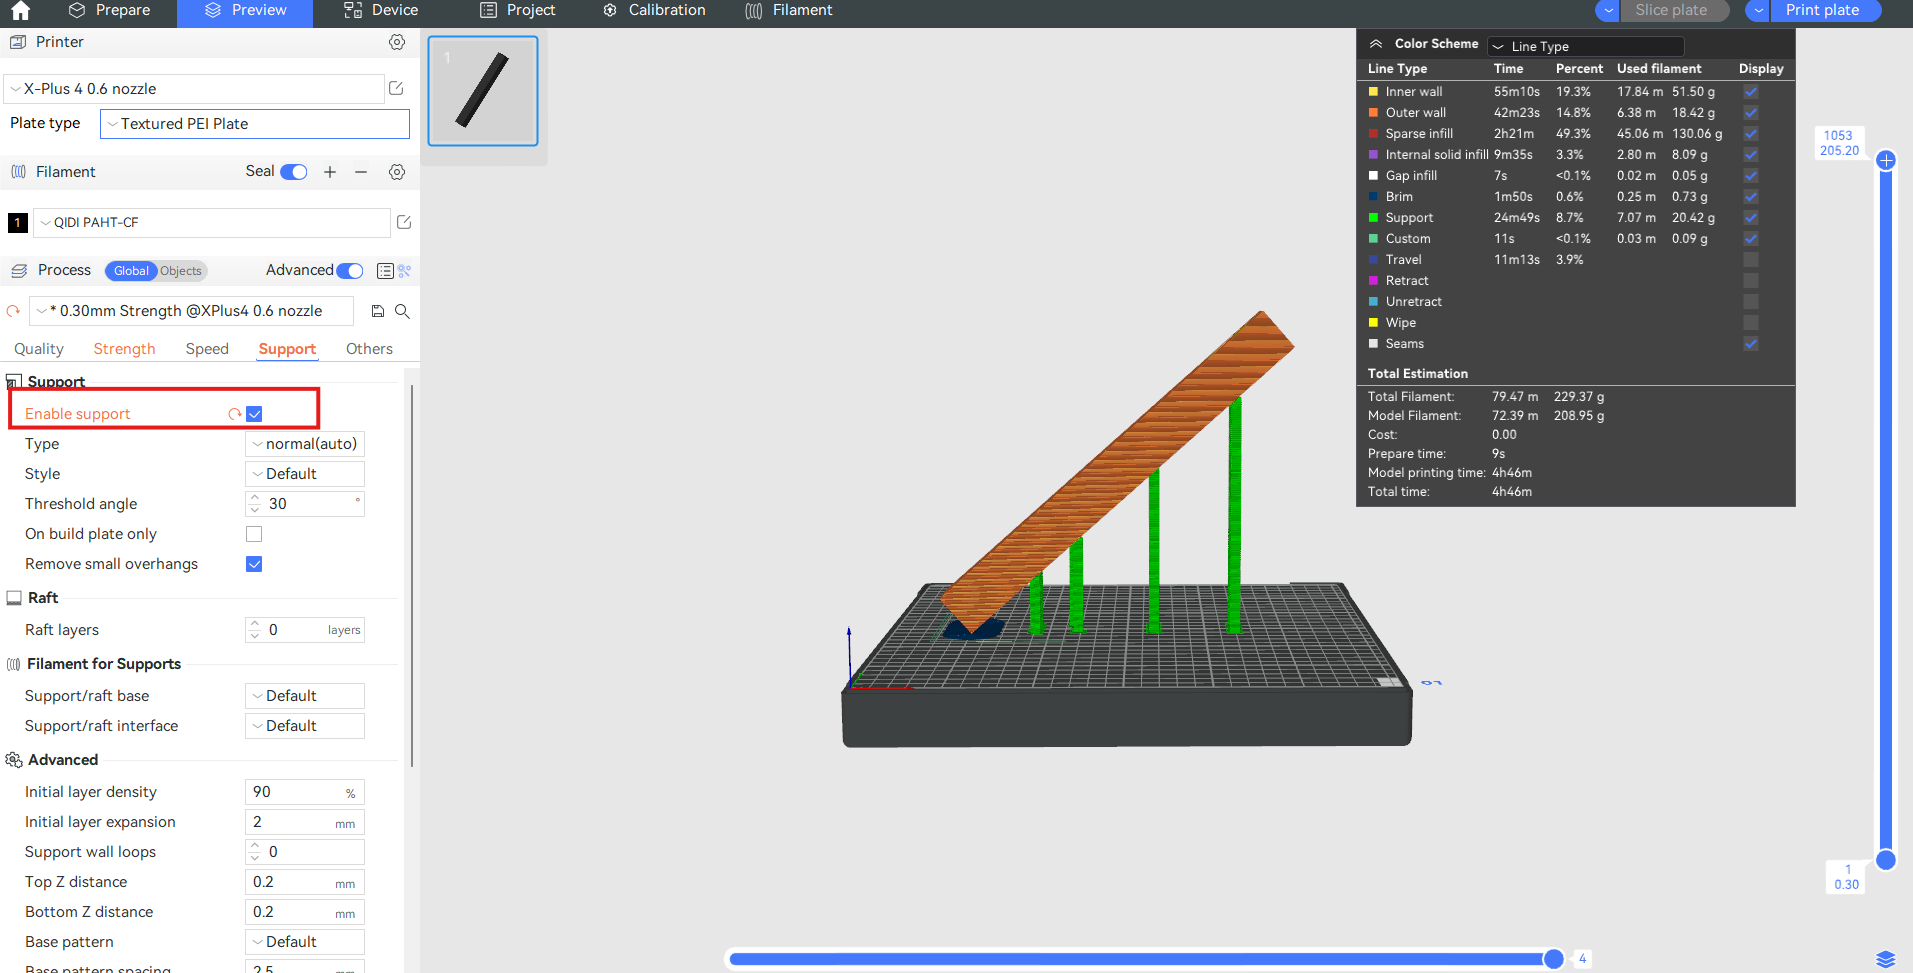
1. Enable support.
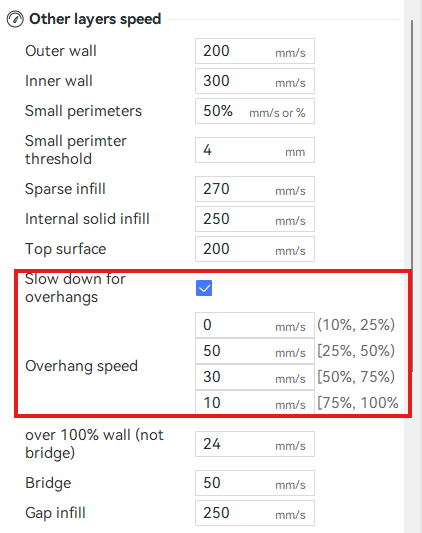
2. Reduce the print speed appropriately, or enable "Slow down for overhang", and further reduce the overhang speed if necessary (as shown in the picture below)
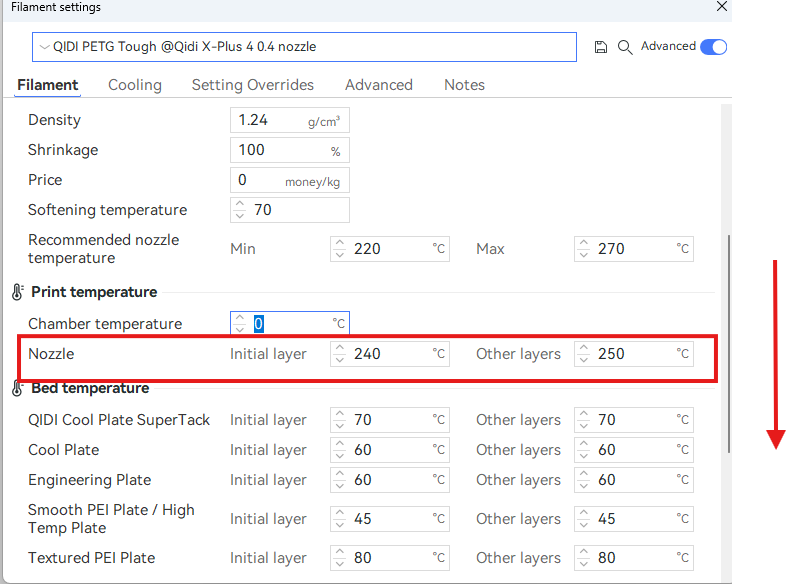
3. Properly reduce the nozzle temperature. When the overhanging part is printed at a slower speed, the nozzle temperature can be lowered for printing, which also helps to reduce the requirement for cooling.
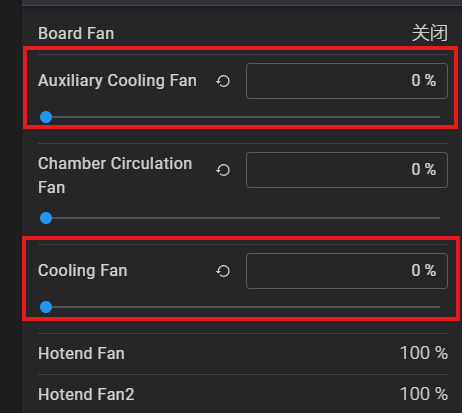
4. Increase the speed percentage of the Auxiliary Part Cooling Fan and Part Cooling Fan appropriately. If the overhang quality is consistently poor, please check if the Part Cooling Fan and Auxiliary Part Cooling Fan work properly during the printing process. This can be tested by switching and adjusting the fan speed percentage in the slicer (as shown below).
5. Open the front door and the top glass cover of the printer for better heat dissipation. (This is generally only applicable to PLA, PETG, and TPU filaments. Operating in this way for other filaments may cause warping and weaker layer adhesion due to excessively low chamber temperature.)
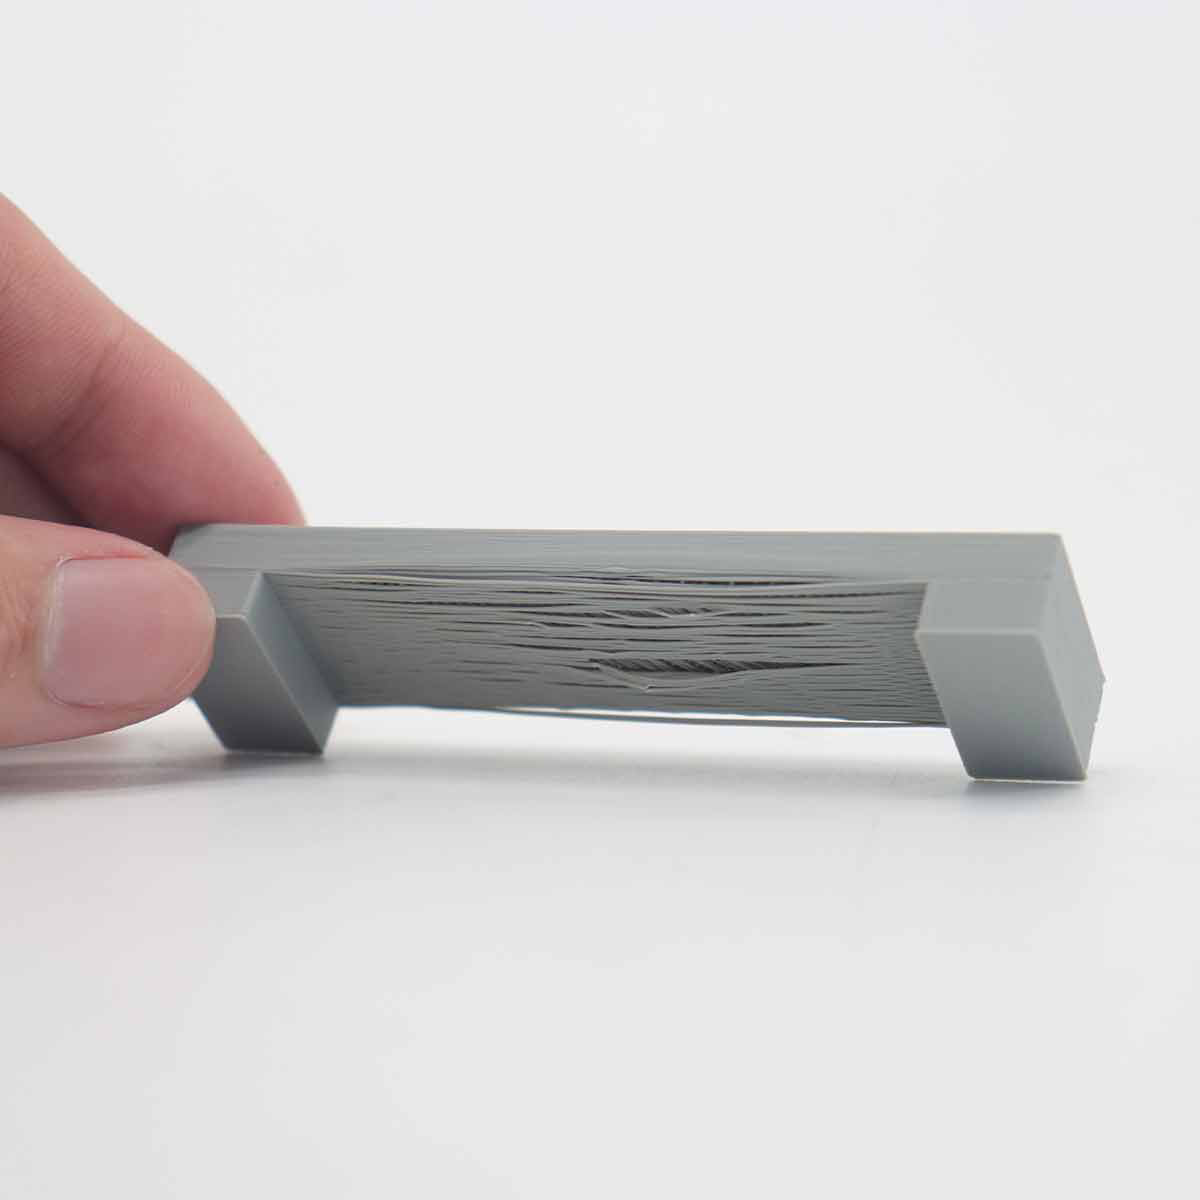
¶ Bad bridging quality
The poor quality of bridging is because the extruded filament is not smoothly bridged. The common causes and corresponding solutions are as follows:
1. The bridge distance is too long - Enable support.
2. The bridge speed is too high and the bridge flow is too low, causing the bridge to be pulled off - adjust the bridge speed down appropriately or (and) enable the ‘Thick bridges’.
3. The bridge speed is low and the bridge flow is high, causing the bridge to sag - appropriately increase the bridge speed or (and) reduce the bridge flow.
4. Insufficient cooling of the bridging filament - properly reduces the nozzle temperature and increases the speed percentage of the Auxiliary Part Cooling Fan and Cooling Fan for Hotend to accelerate cooling.
¶ Model warping, falling off, or collapsing
Printing warping, falling off, or collapsing is usually caused by shrinkage during printing and insufficient adhesion to the build plate. After warping, a horizontal line may appear on the printing surface due to the reduced distance between the warped part and the nozzle, resulting in the extrusion of the layer being flattened and overflowing.
The following are potential reasons for the issue and their corresponding solutions:
1. The model is too thin and tall, with a high center of gravity, and the printing process falls off and collapses due to shaking.
- Enable support.
- Decreasing printing speed and acceleration.
- Change the arrangement before slicing, try to arrange the model in a lie-down way or cut the model and print it.
2. Nozzle hit printing.
-
If the nozzle temperature is insufficient, the filament melting is not sufficient during the high-speed printing, and the extruded melt has a higher stickiness and poorer flowability, which easily causes the nozzle to scratch the printing. In this case, it is recommended to increase the nozzle temperature appropriately. In addition, if the nozzle or the printing is partially stuck with the block, it may also lead to the nozzle hitting the print during the printing process. In this case, it is recommended to clean the nozzle appropriately and then print it again with the reduced nozzle temperature and printing speed.
-
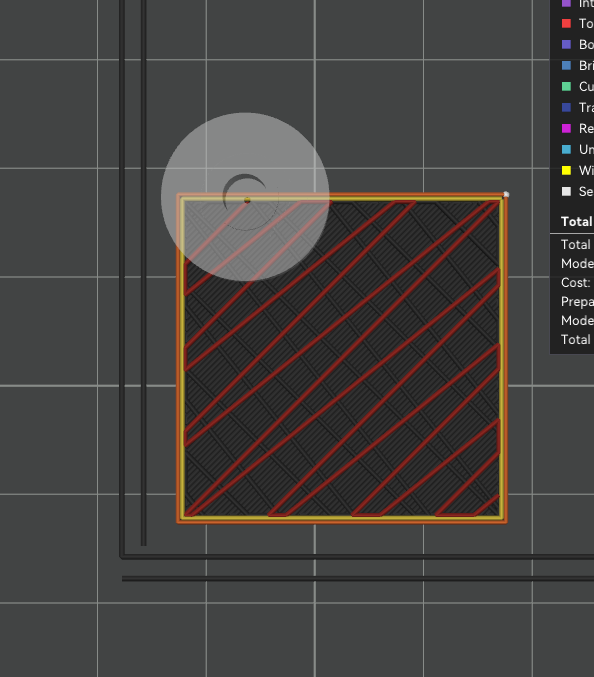
Some infill patterns (such as Grid, Triangles, etc.) have crossings within a single layer, so the nozzle will scratch the infill at the crossing point, which usually does not have much impact on the print. And if this does happen and affects the adhesion of some printing, you can try to slow down the infill printing speed or change the infill pattern without crossing points, such as Line, Rectilinear, Gyroid, or Concentric.
Reduce the sparse infill speed
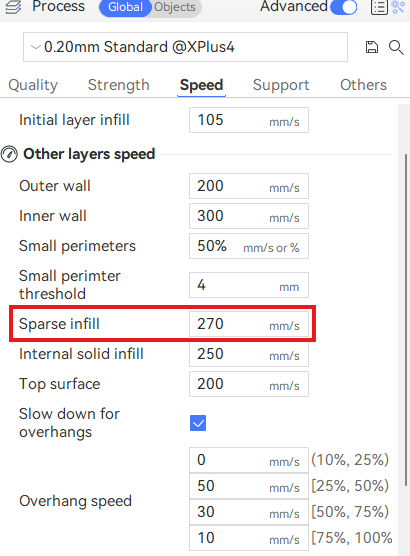
Grid infill, single layer with crossing
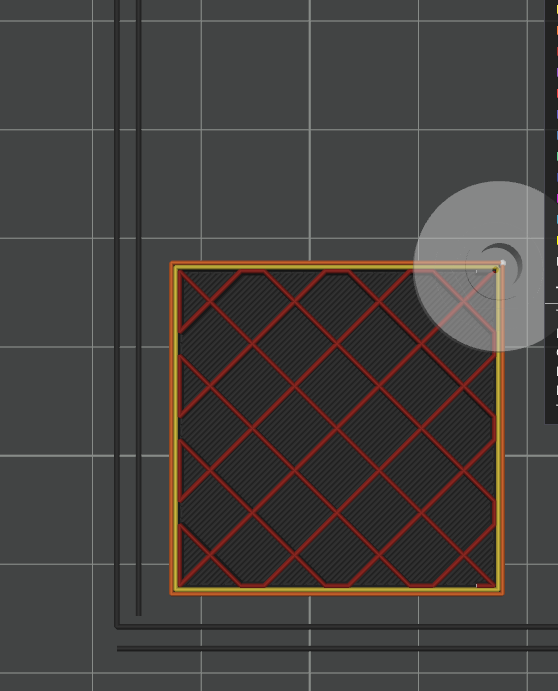
Line infill, single layer without crossing
3. Prints warping is usually caused by insufficient adhesion between the model and the buid plate, too fast cooling of the model, or excessive partial shrinkage of the model. The larger the size of the prints, the easier it is to shrink, and the higher the infill density, the easier it is to shrink; ABS, ASA, PC, POM, PP, PA, and PA-CF are more likely to shrink.
- The bed temperature is too low, resulting in insufficient adhesion of the printing to the heat bed - increase the heat bed temperature appropriately.
- The chamber temperature is too low and the fan speed is too high, resulting in the model cooling too fast - properly raise the heat bed temperature, close the front door of the printer, cover the top cover, and turn down the fan speed appropriately.
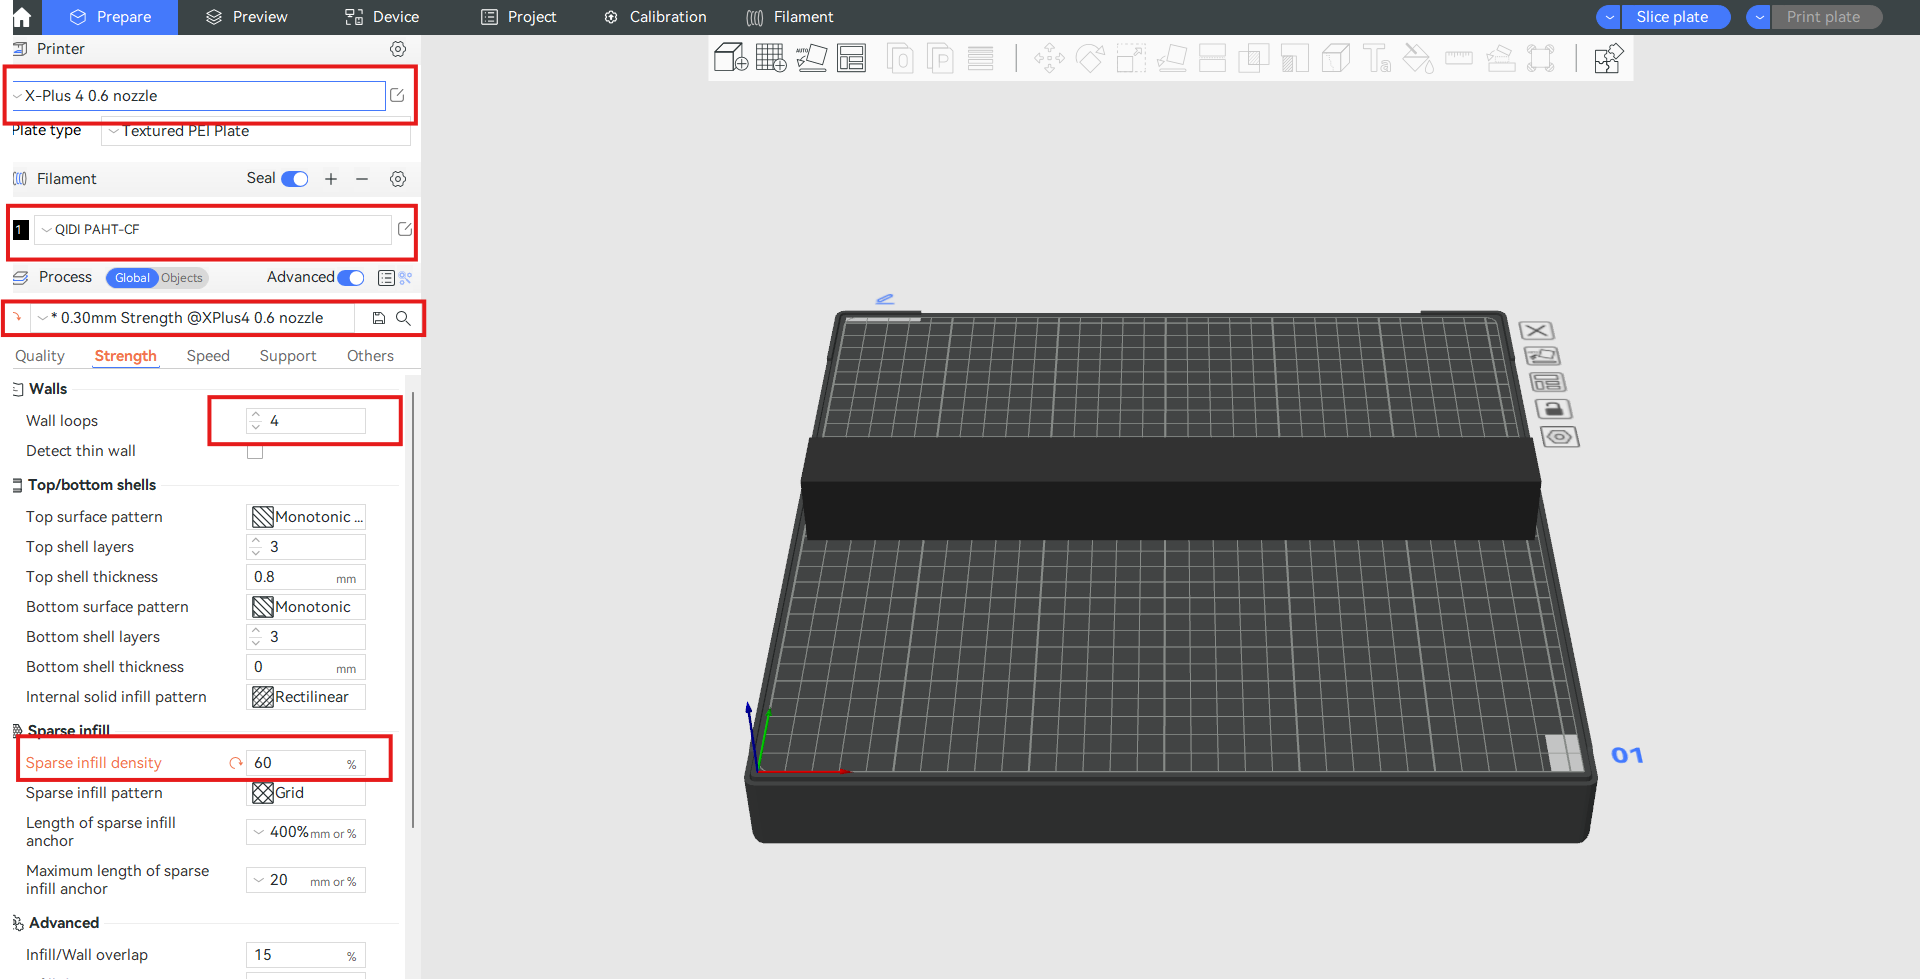
- Large model size and high infill density - If the prints size is large and the infill density is set high, e.g. 60% (default is 15%), and warping occurs, please adjust it appropriately. In addition, the infill pattern with more straight lines is more likely to shrink, you can change the infill pattern to Gyroid to reduce the risk of shrinkage. For some of the structural parts with high requirements for strength, you can set 5 layers of walls and about 25% fill density, and try to avoid using more than 50% fill density to reduce the tendency of shrinkage; for most of the non-structural parts with low requirements for strength, you can directly choose the default 2 layers of walls and 15% fill density.
Insufficient adhesion between the printing model and the build plate.
- The build plate used does not match the "plate type" selected in the slicer - one filament can often be printed on different build plates using different bed temperatures, and if the wrong plate type is selected, there is a risk of insufficient adhesion due to insufficient adhesion. Also, PEI textured plates have particles on the surface, so after leveling the heat bed, the printer will lower the nozzle by 0.04mm to ensure good adhesion of the first layer. If you print on a PEI plate and select other plate in "bed type" when slicing, the nozzle height will be too high, affecting the first layer adhesion.
- The heat bed is not leveled properly - clean the plate and nozzle first, then level the heat bed and print again.
- Dirty or damaged build plate - clean the build plate (with water and detergent) or replace a new print sheet or plate.
- Insufficient Brim - Enable the Brim and increase its width.
- Not properly glued - apply glue evenly on the surface of the build plate before printing.
- Heat bed temperature is too low - Increase the heat bed temperature appropriately.
Other Solution:
(1) The model itself: Avoid printing large models with a large surface area in direct contact with the heat bed. If it is necessary to print a large model, consider dividing it into smaller parts or rotating the model at an angle. Tilting the larger part at an approximate 45° angle in the Z-direction can be beneficial. It is important to note that the interlayer strength of a model is usually significantly lower than the strength vertical to the interlayer, meaning that the strength in the Z direction is usually significantly lower than the strength in the X and Y directions. Therefore, if you require a high load-bearing capacity for a model, avoid having the layers bear the main load. When arranging models, ensure that the interlayer does not become the primary load-bearing area. For example, if you want to print a large structural part that needs to bear a great load with PA-CF, you can refer to the following picture for arranging.
Arranging the models as shown in Picture results in a large contact area between the model and the heatbed, which means that a significant portion of the model lies in the X and Y directions. This arrangement provides strength advantages, but it also increases the risk of warping — Not recommend.

Arranging the model as shown in Picture results in a very small contact area between the model and the heatbed, meaning that the percentage in the X and Y directions is minimal. This arrangement helps to avoid warping, but it also has the disadvantage of a significantly larger percentage in the interlayer (Z direction), resulting in lower strength for the model — Not recommend.
By arranging the model as shown in Picture C, the model will have a similar percentage in the X&Y and Z directions, which helps to prevent warping while maintaining strength. It's important to note that this arrangement may result in more overhang areas. To solve this, appropriate support needs to be added to the model. You can turn on auto support or finish support painting manually, depending on the characteristics of the models.
(2) Filament selection: It is important to note that high-temperature filaments such as ABS, ASA, PC, PA, PA-CF and others are more easily to warp. Therefore, it is advisable to avoid them whenever possible for large-size prints. Instead, It is recommended to select filaments like PLA, PLA-CF, PETG, PETG-CF, PET-CF and others that are less prone to warping.
4. Other Instructions
- If the shrinkage force of the prints > the magnetic force between the prints and the heat bed > the adhesive force between the prints and the build plate, then warping and separation are more likely to occur between the prints and the build plate. In this case, the adhesion between the prints and the build plate should be increased.
- If the shrinkage force of the prints > the adhesive force between the prints and the build plate > the magnetic force between the build plate and the heat bed, then warping and separation are more likely to occur between the build plate and theheat bed. In this case, the adhesion between thebuild plate and the heat bed should be increased. For example, after printing starts, use metal clips to neck the sides and corners of the build plate and the heat bed - be careful to avoid being hit by the machine or affecting the printing.
- Please note that if the print size is large, the infill density is high, and filament with a high possibility of warping is used, shrinkage during the printing process is unavoidable, and the above methods may not completely avoid all potential warping.
¶ The filament sticks to the nozzle
Sometimes, after printing for a period of time, a small part of the extruded filament adheres to the nozzle, resulting in a lack of material, roughness, and other phenomena in the printing model. More seriously, the nozzle will have a large mass of material, resulting in printing failure.
This problem generally occurs when printing PETG filaments, which include ordinary PETG and PETG-CF,the following are the corresponding solutions.
1. The filament is damp
Although the water absorption rate of PETG filament is relatively low, after exposure to humid air for a certain time, the filament will still be damp, and the greater the ambient humidity, the faster the filament will be damp, resulting in problems such as sticking nozzle, stringing, oozing, and rough print surface. The reason is that when the water vapor carried by the filament passes through the nozzle, it will expand violently due to the heat, which causes the melt at the nozzle to expand and spread around, and when a part of it adheres to the outer wall of the nozzle, it may cause the sticking nozzle. The corresponding solution is to put the filament roll in a blast oven, dry it at 65 to 75 ° C for about 8 hours.
2. The flow ratio is too large, or the nozzle is worn and the actual ratio is larger than the set one
For PETG filaments, the recommended flow ratio is between 0.93-0.96. If it is lower than 0.93, the risk of material shortage will increase, and the interlayer bond strength of the model will be low. If it is higher than 0.96, the model strength will be higher, but the risk of leakage and sticking nozzle will be increased.
3. Printing speed is too low or printing temperature is too high
In general, the higher the printing speed, the more filaments need to be melted per unit of time, and the higher the nozzle temperature required. When the printing speed is very high, the nozzle temperature needs to be properly adjusted to avoid insufficient melting of the filament, resulting the material shortage. On the contrary, when the printing speed is very low, the heating time of the filament in the nozzle is longer, the melting is more thorough, and the fluidity of the melt is stronger. At this time, if the nozzle temperature is not properly lowered, it may cause problems such as string, material leakage, and sticking nozzle. Therefore, when you reduce the printing speed and maximum volumetric speed (corresponding to the highest printing speed), please reduce the nozzle temperature appropriately at the same time.
4. The nozzle wiping part is worn, loose, too small or damaged
After being used for a period of time, the nozzle wiping part may have been worn, loose, small in height or damaged, resulting in poor nozzle wiping effect and filament residues sticking to the nozzle. Please confirm whether these problems exist by visually inspecting, moving the nozzle wiping part by hand, pushing the hotend to the nozzle wiping part to compare the height after power off, and pushing the hotend to hit the nozzle wiping part quickly. If these problems are found, the nozzle parts need to be repaired or replaced.
5. The model itself has too many long jumping areas (discontinuous areas)
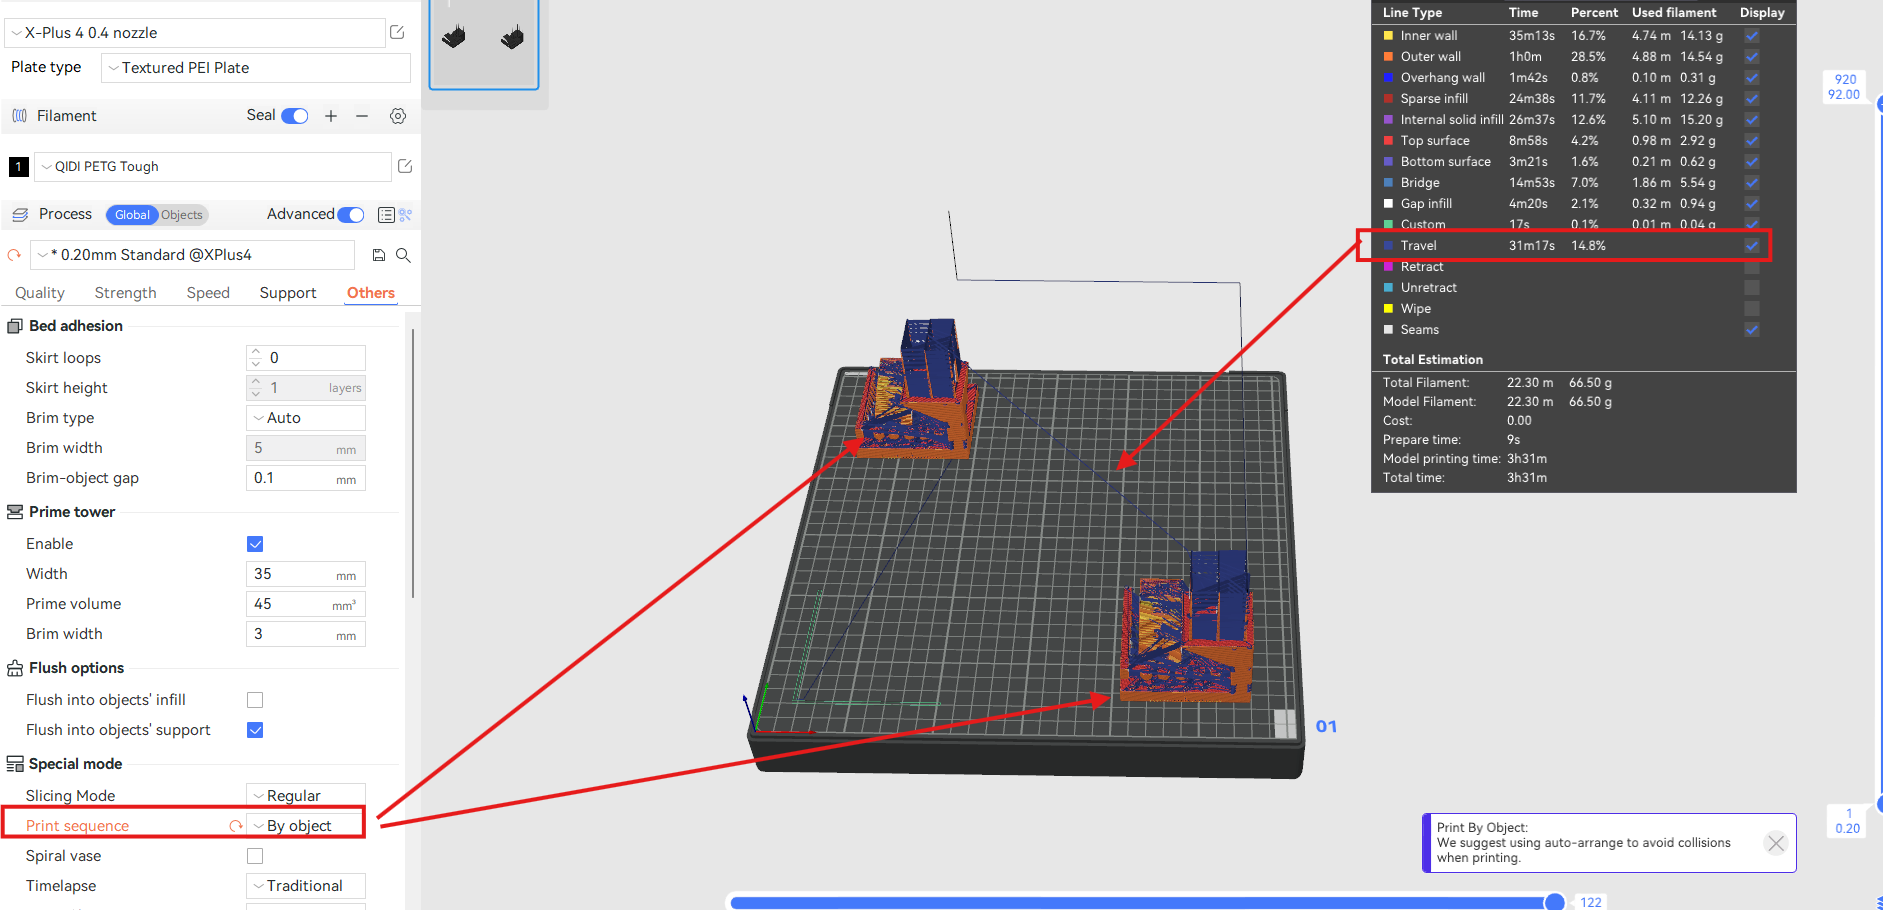
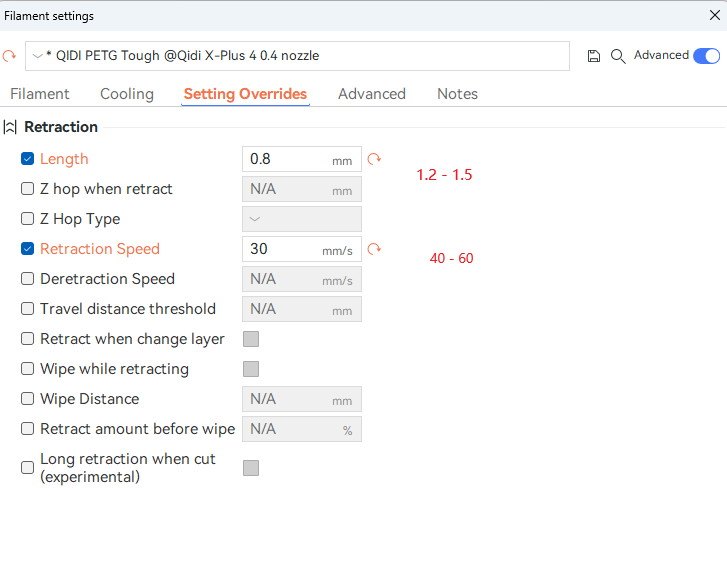
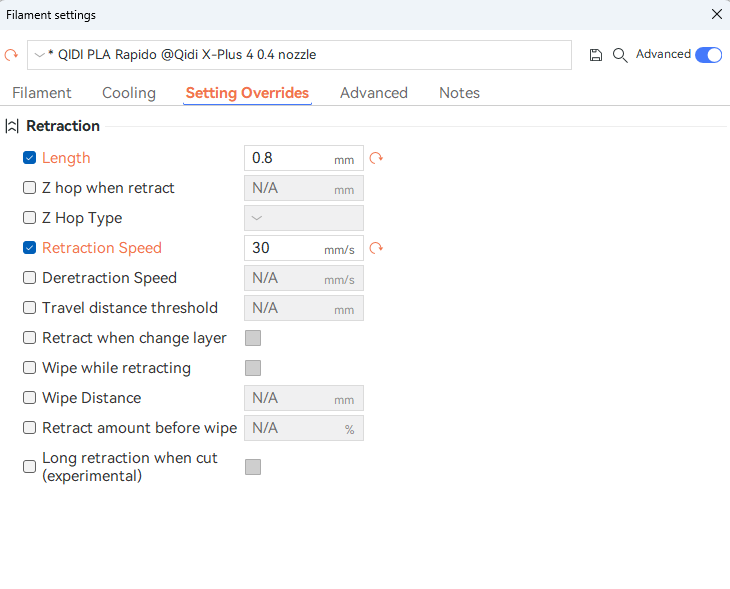
If the model itself has many long jumping areas(discontinuous areas), or if the model placement is unreasonable, resulting in many long-distance travel during printing, then the filament melt in the nozzle may ooz out during the travel process during printing and be rubbed against the outer edge of the nozzle during printing and accumulate continuously, causing the nozzle sticking. At this time, a reasonable model placement method should be used to avoid too many long-distance travels. You can also consider appropriately increasing the retraction length and retraction speed. Note: When the retraction length is set too large, it may cause clogging. It is generally recommended not to exceed 2 mm.
Not suggested methods of placement and printing

Suggested methods of placement and printing
Increase the retraction length and retraction speed: 1.2 ~ 1.5 mm, 40 ~ 60 mm / s
¶ Under extrusion
This is usually caused by insufficient extrusion, and there are two phenomena: overall under-extrusion and local under-extrusion.
The following are potential reasons for the issue and corresponding solutions:
1. Excessive extrusion resistance
- Stuck spool or tangled filament - check and rearrange before printing
- PTFE tubes have foreign objects, partially bent or worn - clean foreign objects, or replace the tube.
- Extruder gears stuck or damaged - clean or replace gears.
- Blockage of the internal passage of the nozzle, difficult extrusion (easy to happen after a long time of printing the filament containing fiber) - clean the nozzle or replace the nozzle with a new one.
2. The extrusion volume is too small
The melting and extrusion speed of the filament cannot keep up with the printing speed - increase the nozzle temperature or decrease the printing speed appropriately. If you want to turn on higher speed printing,it is better to increase the nozzle temperature ( about 10 °C) to increase the melting speed of the filaments. If you want to use third-party filaments (which may not support high-speed printing), please select the Generic parameter for slicing and printing with a relatively low printing speed.
- Blockage of the internal passage of the nozzle, difficult extrusion (easy to happen after a long time of printing the filament containing fiber) - clean the nozzle or replace the nozzle with a new one.
- If the entire surface of the model is obviously lacking material, it is also possible that the flow rate is not enough, you can increase the flow rate a little in the slicer.
3. Inappropriate PA value
When the model is short of material at the corner (figure below), then it is likely that the pressure advance value is set incorrectly and the flow needs to be recalibrated.
The function of flow calibration is to ensure that the filament extruded by the extruder can remain uniform when the tool head is moving during printing, avoiding excessive or insufficient material at the accelerating or decelerating nodes. If the pressure advance value is wrong, it may lead to the instantaneous extrusion of too much or too little filament.
The essence of flow calibration is to find a suitable extrusion compensation value to ensure the uniform extrusion line during the acceleration and deceleration movement of the tool head.
¶ Stringing and oozing
Cause: excessive nozzle extrusion or abnormal expansion and flow of molten filament.
-
Damp filament - It is recommended to dry the filament first and then use it in an airtight container with desiccant.
-
The model has a long travel distance and a small retraction length, which causes the filament to flow out of the nozzle during travel - when printing multiple models, reduce the spacing between the models, and appropriately increase the retraction length or retraction speed. Note: When the retraction length is set too large, it is easy to cause the plug, and it is generally recommended not to exceed 2 mm.
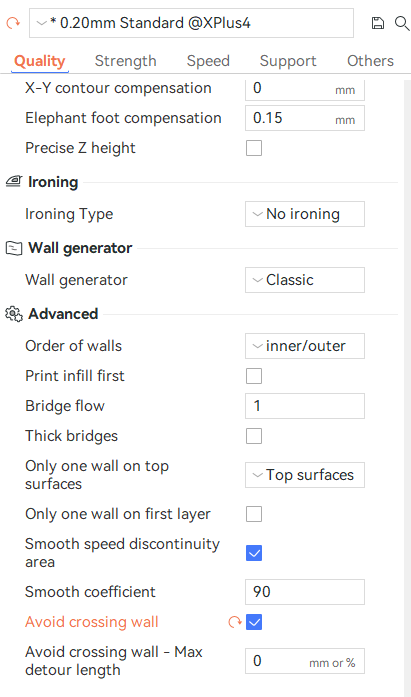
- The model has special structure or improper placement. When there are more discontinuous structures in a single model and the spacing between the models is large, there will be long-distance traveling in the printing, so the melted filament will drip down during traveling, resulting in defects such as stringing and ozzing. In this case, the placement distance between models can be reduced. You can also enable "Avoid crossing walls" to reduce the probability of stringing.
-
The nozzle temperature is too high, resulting in the viscosity of the molten filament being too small - properly reduce the nozzle temperature.
-
When using low-density filaments (such as LW- PLA), the print temperature or flow ratio is not properly set - it is recommended to properly reduce the print temperature and set the flow ratio between 0.5 and 0.7. Low-density filament, such as LW-PLA, there are more holes and gas (water) in the interior, and the printing process will produce gas, which will cause the molten filament to produce a large expansion, so it is recommended to dry the filament before printing and set a lower flow ratio when slicing.
-
The nozzle aperture is too large, resulting in more filaments flowing out of the nozzle.
- Choose the wrong nozzle size when slicing, or use a larger diameter nozzle when printing - before printing, make sure that the selected configuration is the same as the actual nozzle size.
- Nozzle has been used for a long time, there is obvious wear - replace the nozzle.
¶ Different areas of the model have different gloss
Direct cause: the printing temperature is the same, the lower the printing speed, the brighter the surface; At the same printing speed, the higher the printing temperature, the brighter and smoother the surface. The essence is that the degree of material melting is different, the fluidity is different, resulting in the surface roughness of the printing model is different, and this phenomenon is more obvious when printing materials with good reflectivity.
1. The printing speed of different areas of the model is significantly different (such as slow down for overhangs).
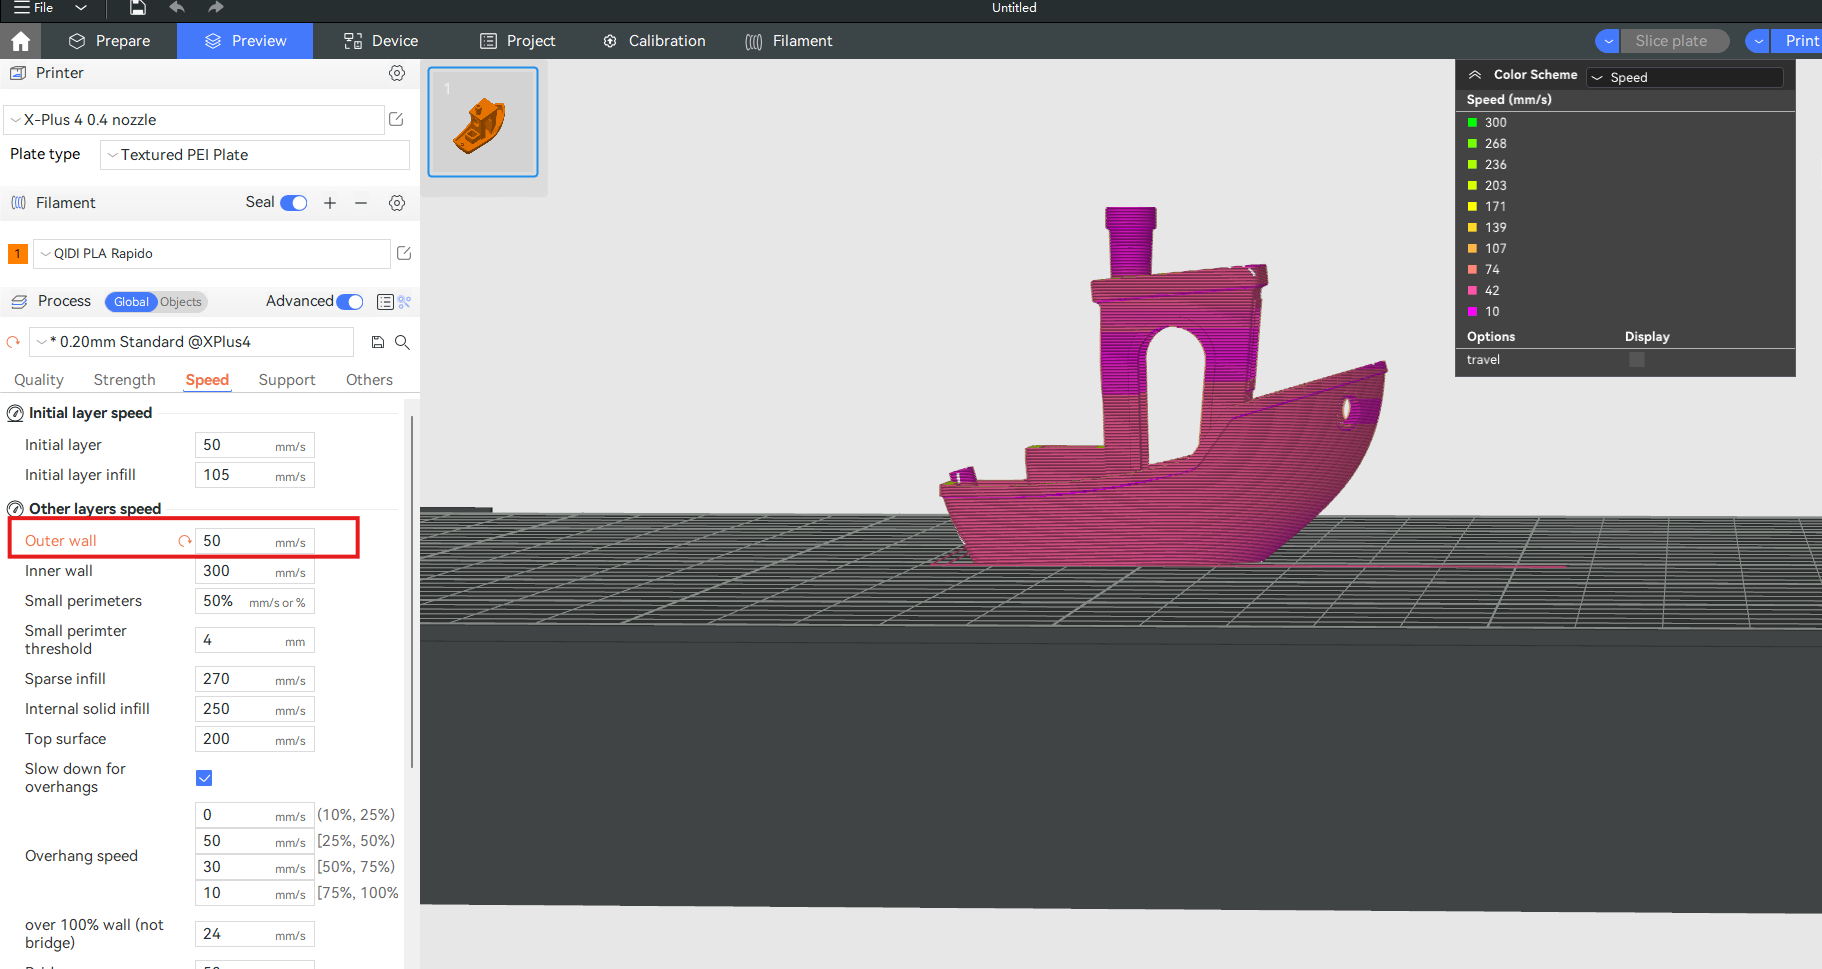
- It is recommended to appropriately reduce the outer wall speed (for large model) or the overall speed (small model), or cancel the slow down for overhangs, to ensure that the printing speed of the outer wall surface is similar or the same.
Reslice and reduce the speed of the outer wall to make the speed of the different areas as consistent as possible:
2. When printing the model with a low layer height (such as 0.08 mm height), if the printing speed is high, it may also cause the surface of the model to appear like a fishscale gloss area.
- Change to a larger layer height, such as from 0.08mm, 0.12mm to 0.16mm, 0.20mm.
- Appropriately reduce the printing speed and increase the printing temperature.
¶ Model interlayer cracking
Direct cause: Weak interlayer adhesion, resulting in model surface cracking, usually occurs in printing ABS, ASA, PC, PET-CF, PA-CF materials.
The common reasons and improvement methods are as follows:
1. Insufficient extrusion, lack of material between layers.
- The filament melting is not sufficient, the viscosity is too large, the fluidity is poor, and the bonding area between the adjacent layers of the extruded filament is too small - appropriately increase the nozzle temperature or reduce the printing speed.
- Nozzle clog, resulting in not smooth extrusion - cleaning, unclogging the nozzle.
2. The bonding strength of the filament is low or the structure of the model part is weak.
- Appropriately increase the number of wall loops and increase the infill rate.
3. Excessive cooling.
- The fan speed is too fast -- reduce the fan speed appropriately;
- Low chamber temperature - properly raise the heat bed temperature, close the printer front door and top glass cover.
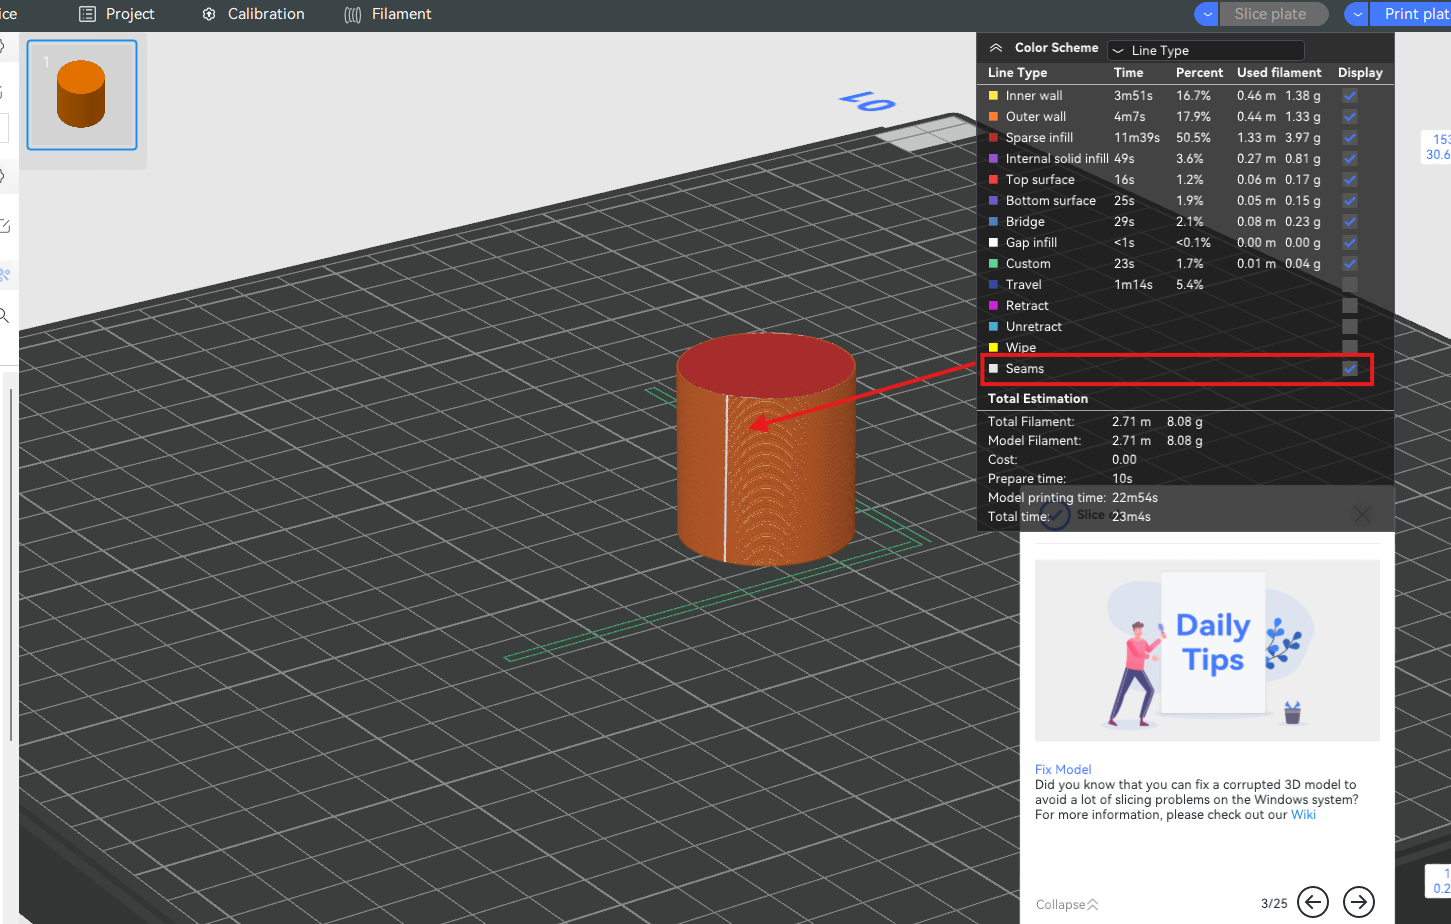
¶ Seam
In FDM 3D printing, a seam is formed at the junction of the starting point and the end point of each layer of printing, which is a normal phenomenon.
You can use the following methods to properly improve the quality of the seam:
-
Set the number of wall loops to 3;
-
Try to avoid printing multiple models on one plate to reduce tool head travel;
-
Appropriately raise the nozzle temperature and reduce the printing speed of the outer wall;
-
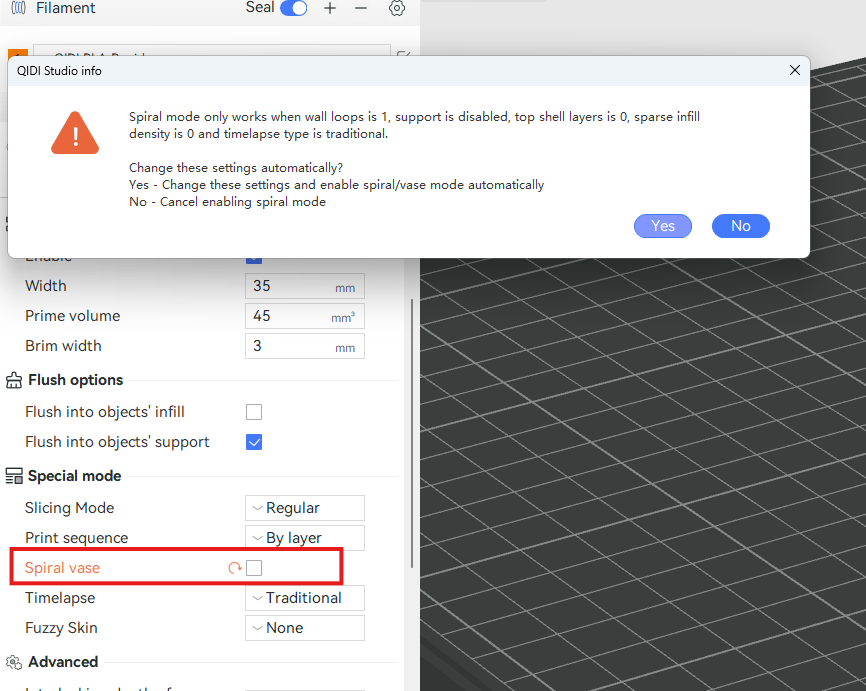
For some special models, you can enable the “Spiral vase” mode. When the "Spiral Vase" mode is enabled, the model will be printed in a linear spiral, and the seams will only appear on the bottom shell ayers , and not on the outer walls at all. Note: The model printed by this mode has only a single outer wall, no infill and top shell, and only applies to some simple models (complex models cannot be completed with a single line, resulting in some suspended sections when slicing).
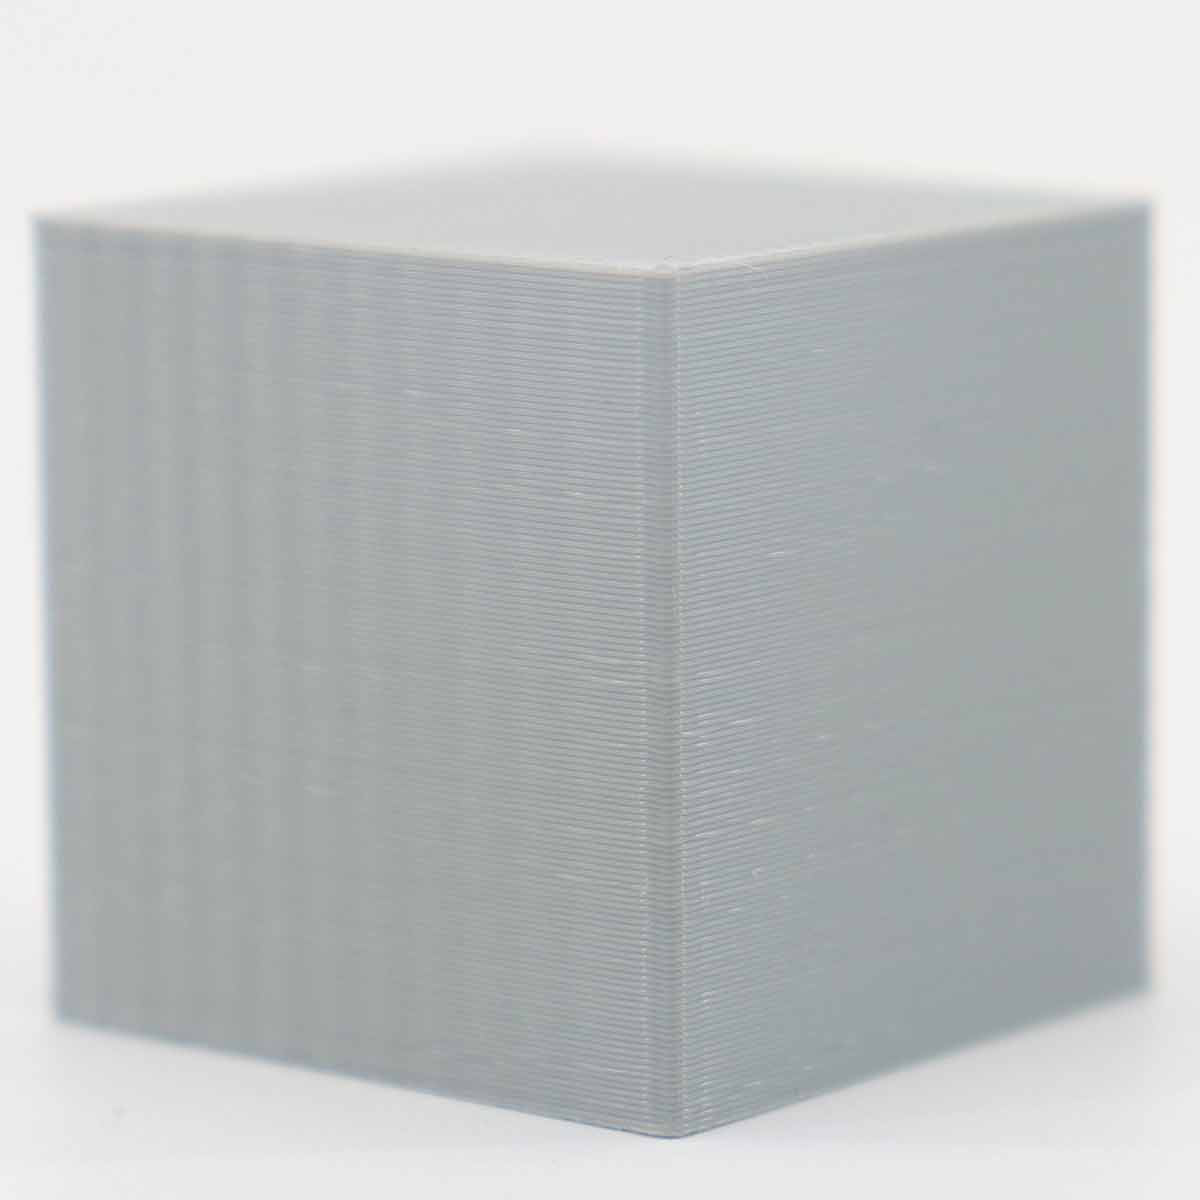
¶ Belt pattern
Cause: During the printing process, the occlusion of the belt and the idler pulley forms a banded pattern, the belt pattern, whose grain spacing is consistent with the printer belt tooth spacing (2mm). In general, Core XY printers are likely to produce this pattern on the print surface.
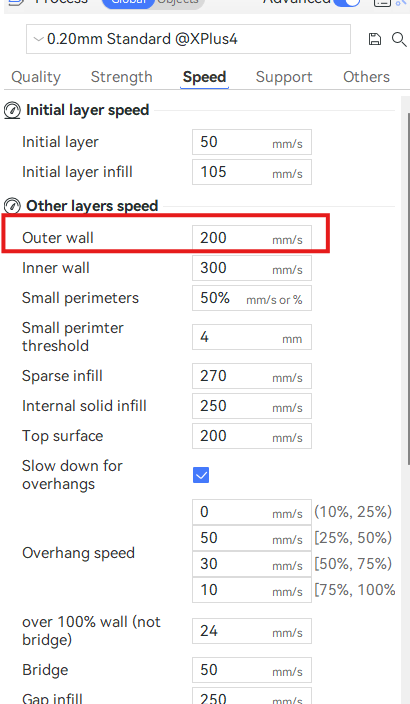
The following method can be used to avoid belt pattern on prints:
Increase outer wall speed: In general, this pattern is linked to the printing speed of the outer wall. It is most pronounced at around 120mm/s. It is recommended to increase the outer wall printing speed to 200mm/s. If the default speed of the filament is low (such as PETG) and cannot be increased to 200mm/s, try to reduce the layer height, or increase the temperature and maximum volumetric flow rate appropriately to avoid the outer wall printing speed approaching 120mm/s. However, we typically advise increasing the outer wall speed.
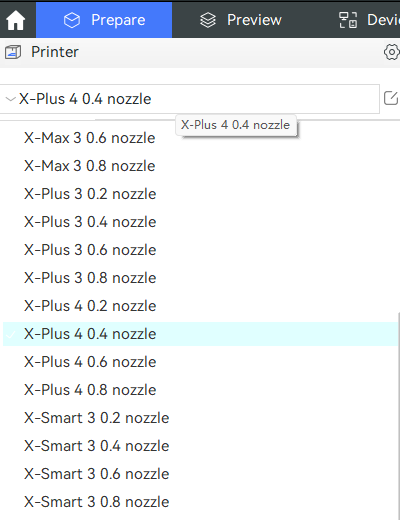
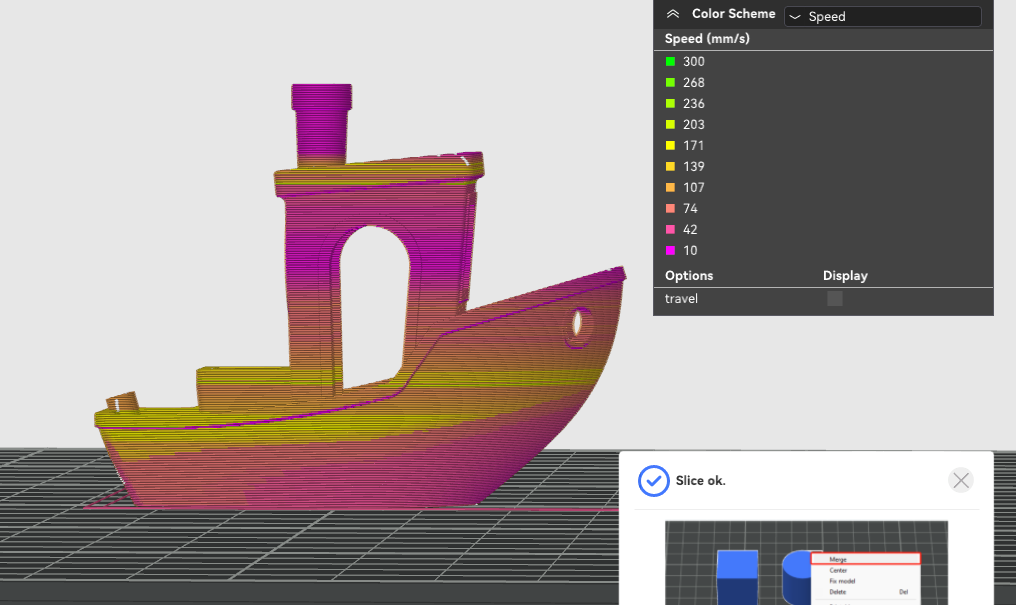
After slicing, you can select the speed in the Color scheme to view the actual wall printing speed of the model.