¶ Remote Printing
If you use other slicer(Orca slicer etc) instead QIDI slicer, you need to add port number ":10088" behind the printer IP.
For example: 192.168.0.8:10088
¶ Step 1--Add the printer
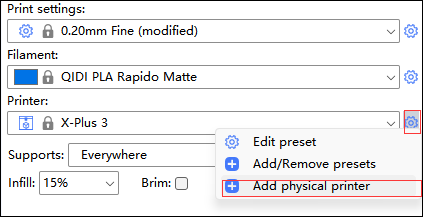
¶ Open the physical printer setting dialog

(You can find this area shown above in upper right corner of plater page.)
- Click the gear icon.
- Click the "Add physical printer" option.
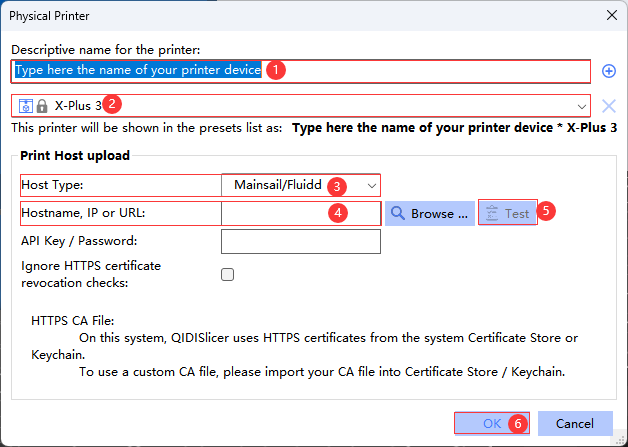
¶ Input our information

(Physical printer setting dialog.)
- Enter the name you want the printer called(just be free).
- Select the printer you want them to work.
- Select one host type.
- Enter the Internal IP address of you printer. For example ."192.168.0.8".
- Test wheather the url is right.
- If process 5 work well,just click ok to end our connection work.
PS:If you need to view the printer on your phone or tablet. You need to open the browser, enter the internal IP address and add ":10088", for example 192.168.0.8:10088
¶ End Confusion
¶ Confusion One--What Can I Get My Printer Internal IP Address?
For most print machine,we just need to do thing below.
- Click network tab.
- Find the WIFI you host in.
- Connect to the WIFI.
- Get the IP.
If your printer can not get the correct IP address because of Unknow DHCP protocol, please add the DHCP protocol to moonraker.conf file. Refer to Add New DHCP protocol
¶ Confusion Three--What Should I Do If Process 5 Work Wrong?
- Examine whether the IP address your input is wrong.
- Examine whether the printer and your host are on the same WIFI network.
- Examine whether the printer disconnect to WIFI network.
¶ Step 2--Generate G-code
This section can be referred to below.
QuickStart
¶ Step 3--Upload and print

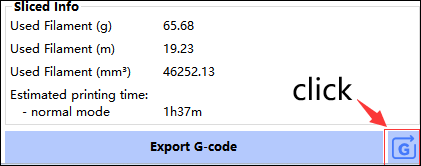
(You can find this area shown above in bottom right corner of plater page.)
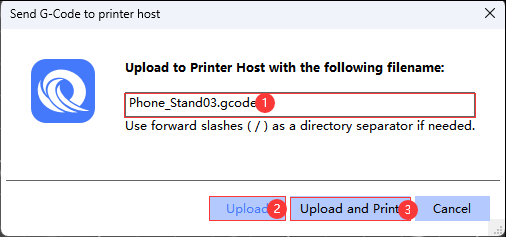
Click the icon above pointed(then you can find the dialog below.)

- Rename your the g-code file.
- Upload the project g-code file to the printer connected(Will not start printing automatically.)
- Upload and print the model by the printer connected(Printing will start automatically.)
¶ Monitor printing process
If we connect the printer successfully,we can monitor printing process in host.
The details are described in below link.
RemoteMoninating